
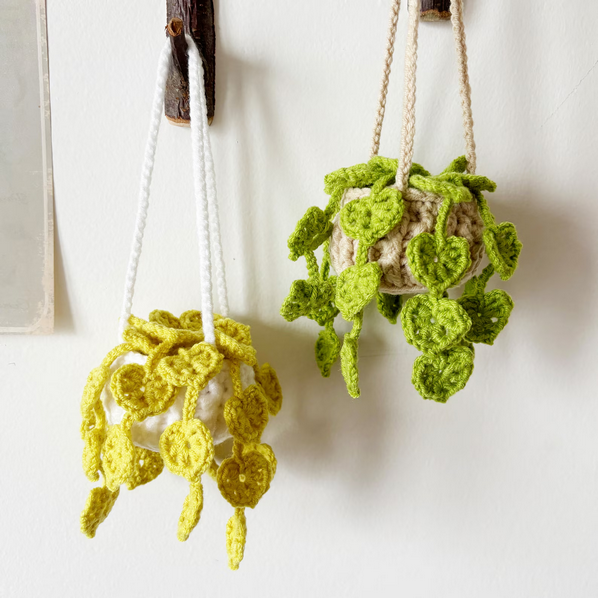
Imagine a sunny corner of your home, where a lush green plant rests in a beautiful, handcrafted crochet plant hanger, adding a touch of bohemian warmth and personal style to your space. Store-bought options are nice, but they lack the soul and satisfaction of creating something with your own hands
If you’ve ever wanted to make your own DIY hanging plant but felt intimidated, you’ve come to the right place. This comprehensive guide is designed for absolute beginners. We will walk you through creating a stunning crochet plant basket hanger, one simple stitch at a time.
By the end of this tutorial, you’ll not only have a beautiful, functional piece of home decor but also the confidence to take on more projects. And for those ready to dive deeper, we have something special waiting for you. Let’s pick up your hook and unleash your creativity!
Love this free pattern? Imagine creating a whole collection! Our premium PDF, Handmade Crochet Knotmonsters Potted Plants Potted,the Boho Crochet Collection, includes 12 exclusive and intricate patterns with full video support. Get Your PDF Bundle Here!
Why Crochet Your Own Hanging Plant?
Before we dive into the “how,” let’s talk about the “why.” Choosing to crochet a hanging plant offers unique benefits that go beyond just a pretty accessory.
- Unbeatable Customization: Unlike mass-produced hangers, you control everything. Choose your favorite yarn color, adjust the length, and add beads or tassels to match your home’s vibe perfectly. We’ll discuss the best yarn for crochet plant hangers later on.
- The Perfect Gift: A handmade crochet hanging plant is a heartfelt, personal gift for plant lovers, newlyweds, or anyone who appreciates unique home decor. It’s a gift that says you care.
- A Rewarding Hobby: The rhythmic process of crocheting is known to be relaxing and meditative. The satisfaction of seeing a tangled skein of yarn transform into a beautiful object is immense.
- Cost-Effective Beauty: With just a single skein of yarn and a hook, you can create a high-end looking decor piece for a fraction of the cost.
Crochet vs. Macrame: What’s the Difference for Hanging Plant?
You might have heard of macrame hanging plant and wonder how crochet compares. It’s a great question!
- Macrame involves knotting cords to create patterns. It’s known for its sturdy, fringe-heavy boho look.
- Crochet uses a single hook to create interlocking loops of yarn. It results in a more textured, fabric-like feel, perfect for creating cozy crochet plant baskets and intricate lace patterns.
Think of it this way: macrame is like strategic knot-tying, while crochet is like drawing with yarn. Both are fantastic! This guide focuses on crochet, which is excellent for creating dense, supportive cradles for your pots. (P.S. Our premium PDF bundle includes patterns that blend techniques, giving you the best of both worlds!).
Gathering Your Supplies: The Simple Crochet Toolkit
You don’t need much to get started! Here’s the essential list for this beginner crochet plant hanger pattern.
Essential Materials:
- Yarn: For a durable and beautiful hanger, we recommend a 100% cotton yarn in a worsted weight (Category 4). Cotton is strong, has little stretch, and holds its shape beautifully. One skein is plenty for this project.
- Wondering about the best yarn for indoor vs. outdoor crochet plant hangers? For indoors, cotton is perfect. For outdoors, a synthetic, weather-resistant yarn like acrylic is a better choice.
- Crochet Hook: A size H/8 (5.0 mm) hook pairs perfectly with worsted weight yarn.
- Scissors: A sharp pair for clean cuts.
- Yarn Needle: A tapestry needle for weaving in ends.
- A 4-Inch Plant Pot: Have your pot ready to use as a size guide as you crochet.
Optional Embellishments:
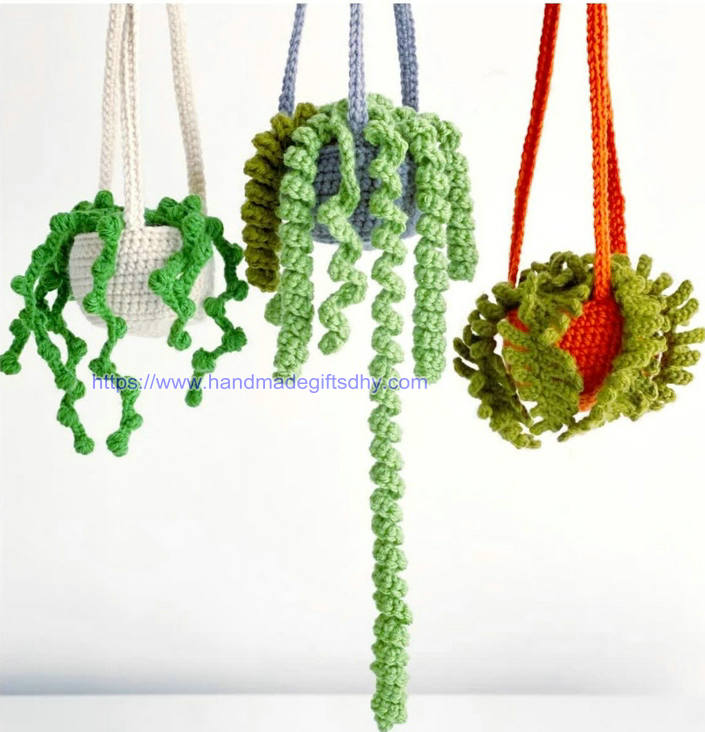
- A Wooden Bead (1.5-2 inch diameter): Like the one featured in the beautiful example from HandmadeGiftsDHY. This adds an authentic boho touch.
- A Ring or Carabiner: For the top loop, making hanging easy.
The 3 Crochet Stitches You Need to Know
Don’t be scared by the terminology! You can create an incredible variety of projects with just a few fundamental stitches. For this easy crochet hanging plant pattern, we will use only three.
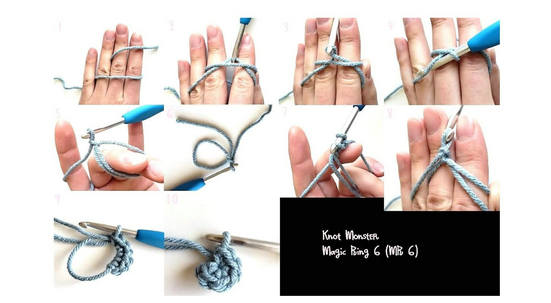
1. Slip Knot (The Starter)
This is how you get the yarn onto your hook.
2. Chain Stitch (ch – The Foundation)
This stitch forms the foundation chain that you build upon.
3. Single Crochet (sc – The Workhorse)
This is a tight, sturdy stitch perfect for creating a strong basket for your plant.
Your Free Step-by-Step Crochet Hanging Plant Pattern
Let’s create the beautiful, textured hanger you saw in the picture! This pattern is written in standard US crochet terms.
Part 1: Creating the Hanging Loop
- Make a slip knot and place it on your hook.
- Chain 25. This will create a long, hanging loop.
- Join with a slip stitch to the first chain to form a large loop. This is the top loop that will go over your hook.
Part 2: Working the Body (The Cradle)
Now, we’ll create the netted basket that holds the pot.
- Round 1: Chain 4 (counts as first tr). Work 23 Triple Crochet (tr) stitches into the large loop. Join with a sl st to the top of the beginning ch-4. (24 tr total). You now have a flat circle.
- Round 2: Chain 1, work 1 Single Crochet (sc) in the same stitch. *Chain 4, skip the next 2 stitches, work 1 sc in the next stitch.* Repeat from * to * around. Join with a sl st to the first sc. You should have 8 chain-4 loops.
- Rounds 3-5: Sl st into the first chain-4 space. Ch 1, work 2 sc in the same space. *Work 3 sc in the next chain-4 space.* Repeat from * to * around. Join with a sl st to the first sc. (24 sc per round).
Pro Tip: After Round 3, place your empty plant pot inside the cradle to check the size. The crochet should snugly hold the pot about halfway up. You can add or remove rounds to customize the fit.
Part 3: Adding the Bead and Tassels (The Boho Finish)
This is where the magic happens, giving you that signature HandmadeGiftsDHY look.
- Creating the Strands: After finishing the body, cut your yarn, leaving a long tail, and fasten off. You will now create 4 separate strands.
- Attaching Yarn: Attach a new piece of yarn to one of the stitches at the bottom of the cradle. Chain 40. Fasten off. Repeat this process three more times at evenly spaced intervals around the bottom of the cradle, so you have four long chains hanging down.
- Adding the Bead: Gather the ends of all four chains. Thread them through your large wooden bead and pull it up about 6-8 inches.
- Securing the Bead: Just below the bead, gather all the strands and tie them together in a tight, secure overhand knot. This knot will hold the bead in place.
- The Final Tassel: Below the knot, separate the chains and trim the ends to be even. For a fuller tassel, you can take small pieces of extra yarn, fold them in half, and attach them to the bottom knot, then trim everything to a uniform length.
5 Common Beginner Crochet Mistakes (And How to Fix Them)
Everyone makes mistakes when they’re learning! Here’s how to troubleshoot common issues.
- Mistake: Stitches Are Too Tight.
- Fix: Relax! Consciously try to keep your grip on the hook and yarn loose. If your stitches are too tight, your cradle won’t have the flexible give it needs to hold the pot.
- Mistake: The Cradle is Too Loose or Too Tight for the Pot.
- Fix: This is why we check the gauge! After Round 3 of the body, place your pot inside. If it’s too loose, use a smaller hook or fewer increase stitches in the earlier rounds. If it’s too tight, use a larger hook or add another increase round.
- Mistake: Losing Count of Stitches.
- Fix: Use a stitch marker! A piece of contrasting yarn or a commercial stitch marker placed in the first stitch of each round can save you from having to count and recount.
- Mistake: The Yarn Splits.
- Fix: This is common with plied yarns. Slow down and pay attention to inserting your hook through the center of the stitch, not through the yarn strand itself.
- Mistake: The Hanger Stretches Too Much.
- Fix: You may have used a yarn with too much stretch (like some acrylics). Cotton is ideal because it has minimal stretch. For your next project, ensure you’re using the recommended material.
Conclusion: You’ve Created Something Beautiful!
Congratulations! You’ve successfully crocheted a stunning, boho-chic hanging plant. Place your plant in its new, cozy home, find the perfect spot to hang it, and take a moment to admire your handiwork. You’ve transformed a simple skein of yarn into a piece of art.
The journey doesn’t have to end here. Now that you’ve mastered the basics, you’re likely feeling inspired to create more. Perhaps a longer, multi-tiered hanger, a different color for every room, or a more complex crochet plant basket pattern.
Ready to Become a Crochet Plant Hanger Pro?
If you loved this free beginner crochet hanging plant pattern, you will be absolutely thrilled with what we have created for you.
We’ve packaged our expertise into a premium, downloadable PDF tutorial bundle: Handmade Crochet Knotmonsters Potted Plants Potted,The Artisan Crochet Hanger Collection.
When you purchase our PDF bundle, you get instant, lifetime access to:
- 12 Exclusive Patterns: Go beyond the basics with designs you won’t find anywhere else for macrame and crochet hanging plant. Think intricate lacework, multi-pot hangers, and modern geometric designs.
- Detailed, Step-by-Step Instructions: Each pattern is as comprehensive and easy-to-follow as this one, complete with high-resolution photos.
- Advanced Tips & Tricks: Learn how to professionally finish your projects, incorporate different beads, and create custom sizes for any pot in your collection.
- Ad-Free, Professional PDF Format: Download it to your devices for easy access on the go, or print a beautiful copy for your craft binder.
Stop piecing together free tutorials online. Get a complete, cohesive, and professional collection that will transform your home into a bohemian oasis.
We hope you enjoyed this free guide. We’d love to see your creation! Share a photo of your finished crochet plant hanger on Instagram and tag us [@handmadegiftsdhy] – you might be featured on our page!
Happy Crocheting!